If you are considering "bundling" your budgeted time and work schedules along with time tracking for customers and projects, this guide will show you how to configure activities with groups.
Determine the level of project activities
Creating group names enables your team to report and merge activities tracked for specific projects & work orders. Tracking against a group name facilitates your downstream processes like billing for activities performed under that group. Basically, all services can be set up in individually as activity names. Refer to the following activity names which are installed by default to help you get started:
-
Travel to site: Charging travel time to the customer. The activity name can be configured to store lump sum amounts.
-
Labor performed: Service A, Service B, Service C - set up an activity name for each type of service. The activity name can be configured to calculate with an hourly rate, e.g. $100 per logged hour.
-
Material cost: create a separate Activity name with the designation and value of material used for your services which will serve as a template for your employee. Configure the Activity name to show a lump sum amount and leave the hours empty.
These Activity names appear in the configured input format on the mobile app and as line items in the list view, as shown below:

When you create activity names for your services these can be assigned to a customer or project name also known as a group. The group name may consist of a building site name, an order number (XYZ00123) or include the customer name and order number (Jones XYZ00123) or just the customer name (Jones). Check below instructions to start creating your own activity names and groups.
Create Activity Names
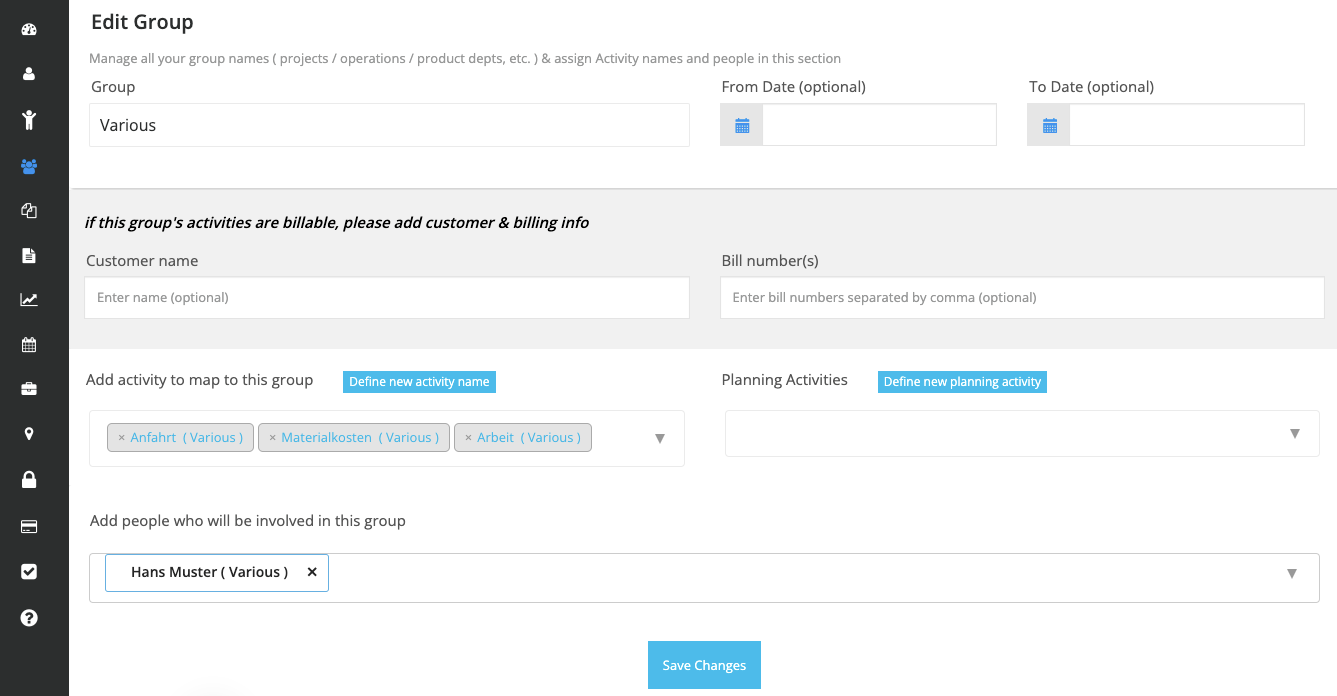
A set of activity names have been installed when you created your company account. In addition, a default group called 'Various' was created and three Activity Names named 'Travel', 'Work' & 'Material' were added to that group to get you started faster as illustrated.

Find more details about setting up Activity names here.
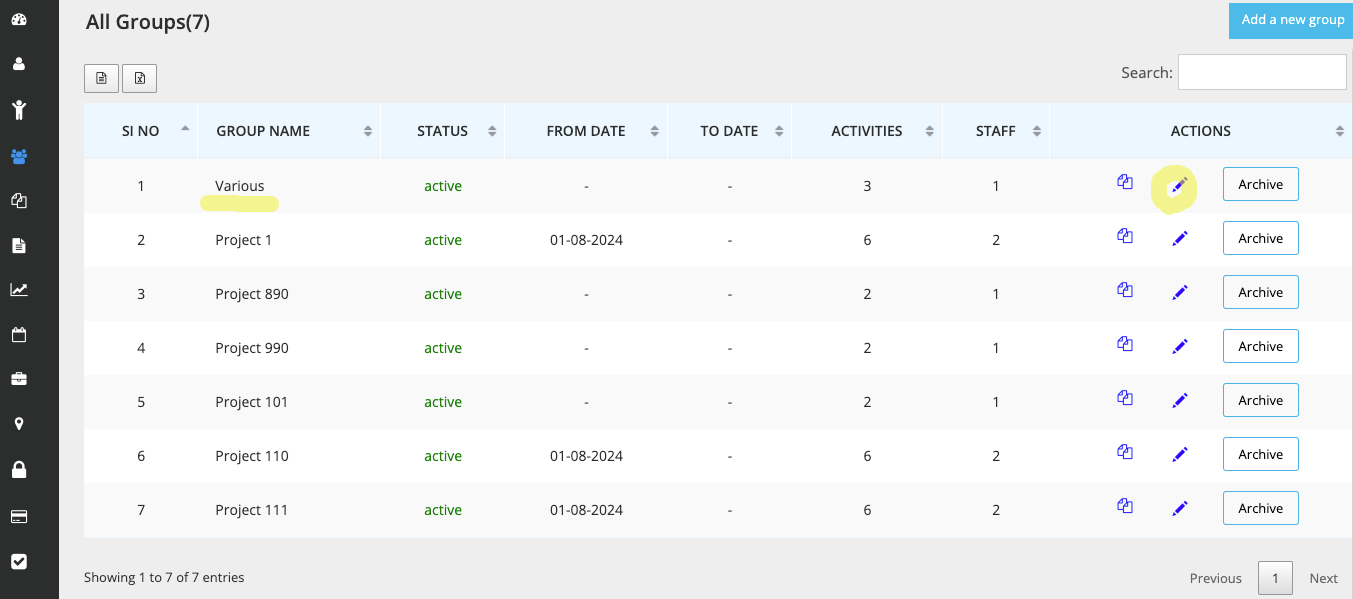
Update the default group "Various"
In the left bar click Manage Groups to reveal a list view. Select the default group named Various and switch to edit mode by clicking the pencil icon, as shown below:

While in edit mode, you can define new activity names used for time tracking and define one or more planning items to be used to create work schedules for your staff using the blue buttons shown below. Secondly, provide access rights to select staff members by cklicking the dropdown arrow.

To change existing activity names, planning items or assigned employees simply click into the respective dropdown and remove that element. Import an Activity name from another group by simply clicking the dropdown which will show all other activity names available. Planning items cannot be imported from other groups but need to be defined anew using the blue button as shown above.
Set up a new group
If your default group "Various" is complete, you can now create further groups and copy or import those activity names in just a few steps. Proceed as follows:
Create a new group
-
click the Add a new group blue button from the list view (see above screenshot). Fill in the desired detail along with the following:
-
Add Activity names: click selection list or hit the Define Activity blue button to divert to the new new activity page, fill in the required detail and return to the group.
- Add Planning items: click the Define Planning item blue button to diver to the new planning item page, fill in required detail and return to the group.
-
Add employee: click the dropdown list and select the user. If not listed please check if you have create the user in the Manage users page.
-
Click Save to save your group. The group name and associated activity names are instantly deployed to the My Time app for the entitled users.
Copy a group
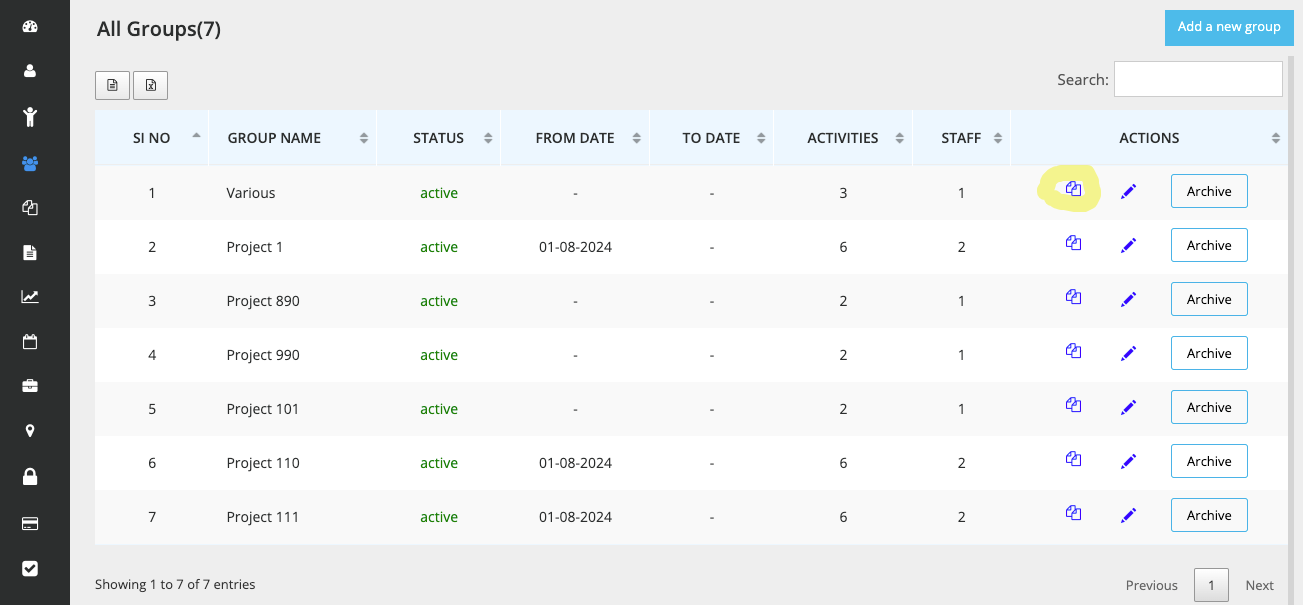
Alternatively, for faster results you may wish to copy an existing group. This can be done from the list view by clicking the Copy icon as shown:

The group including all activity names, planning items and employees is copied instantly and a new row appears with the previous group name along with the suffix '(2)'. To rename the group click the pencil icon on that row and update to the desired name and save the group.
If groups are used for projects and customers we suggest to use names which can easily be sorted, historized and found within the My Time app as well as within the Planning tool. Some examples:
- Project Jones-01 whereby 01 may be the starting sequence should there are follow up projects
- P-Jones-2408 whereby 2408 refers to the year and month the project started
Reporting on group results
Use the icons provided in the list view to get quick access to a history of time logged and work schedules (if used) found under that group. In addition, the Planning icon will open the Planning page with a calendar timeline and breakout by staff member. Adjust the report date range as desired.
Time to start tracking
When you have completed setting up your projects, including activity names, switch to the mobile app and start time tracking. In the app, add a new Daily Activity. First, tap the Refresh icon of the pull-down list to update the names list then you are ready to create a time log for that project as illustrated:

Look up the Master report
In the web control panel look for the Master Report (Manage Timesheets) to query all time logs under that project name. In the report result, the hours and amounts entered are summed up. The result can be exported as PDF, Excel or CSV file and further processed.

Please note; updating or deleting a group name can only be done from the Administrator's account ie. mobile app users have only read rights. If you subsequently change the group name, the historical time logs with the previous group name will be retained in the app.